
Use this compact rule set before you enter any intraday trade: define your stop using ATR, set a profit target at a minimum 2:1 reward-to-risk ratio, submit a bracket or OCO order to enforce both automatically, and flatten the position by a preset time or when you hit your daily loss limit. Backtest each parameter, since slippage and gaps mean live results rarely match the numbers on your screen. Trade-4 lets you validate these thresholds against tick-level historical data before you risk a dollar.
TL;DR:
- Setting ATR-based stops and tiered profit targets with bracket or OCO orders ensures disciplined exits and minimizes emotional decision-making during trades.
- Trade duration dictates different exit rules: scalps require tight, mechanical stops; intraday swings need ATR-calibrated stops and time-based flattening; overnight positions demand separate risk management.
- Proper stop placement involves technical levels, plus a buffer beyond those levels, especially for momentum or breakout trades, to prevent being stopped out by market noise.
- Scaling out during intraday swings optimizes profits while reducing risk, but full exit is necessary after adverse news or breaches of key levels.
- Backtesting specific parameters like ATR multiples, trailing stops, and time-exit effectiveness against historical data improves confidence in adherence to these rules.
Table of Contents
- Why Your Holding Period Should Dictate Your Exit Rules
- How Do You Place Stops That Won't Get Hunted?
- When Should You Scale Out Instead of Exiting Fully?
- What Time Should You Flatten Intraday Positions?
- Bracket Orders, Trailing Stops, and the Slippage You Can't Avoid
- How Much Should You Risk Per Trade and Per Day?
- Three Worked Examples You Can Backtest Today
- Which Backtests Actually Validate These Exit Rules?
- The One-Page Rulebook for Every Intraday Trade
- Common Behavioral Traps and the Habit That Changed Outcomes
Why Your Holding Period Should Dictate Your Exit Rules
The exit rules that work for a 90-second scalp will wreck a 45-minute momentum trade, and vice versa. Before you set a single stop or target, you need to know which holding-period category your setup falls into, because each one demands different exit mechanics.
Scalps last seconds to a few minutes and depend on tight, mechanical stops with almost no discretion. Intraday swings hold for 15 minutes to a few hours and need room to breathe against noise while still respecting a hard cutoff before the close. Multi-day swings don't belong in this conversation at all. The moment you're holding overnight, you've left intraday exit management and entered a different risk framework entirely, with gap exposure that ATR-based intraday stops were never built to handle.
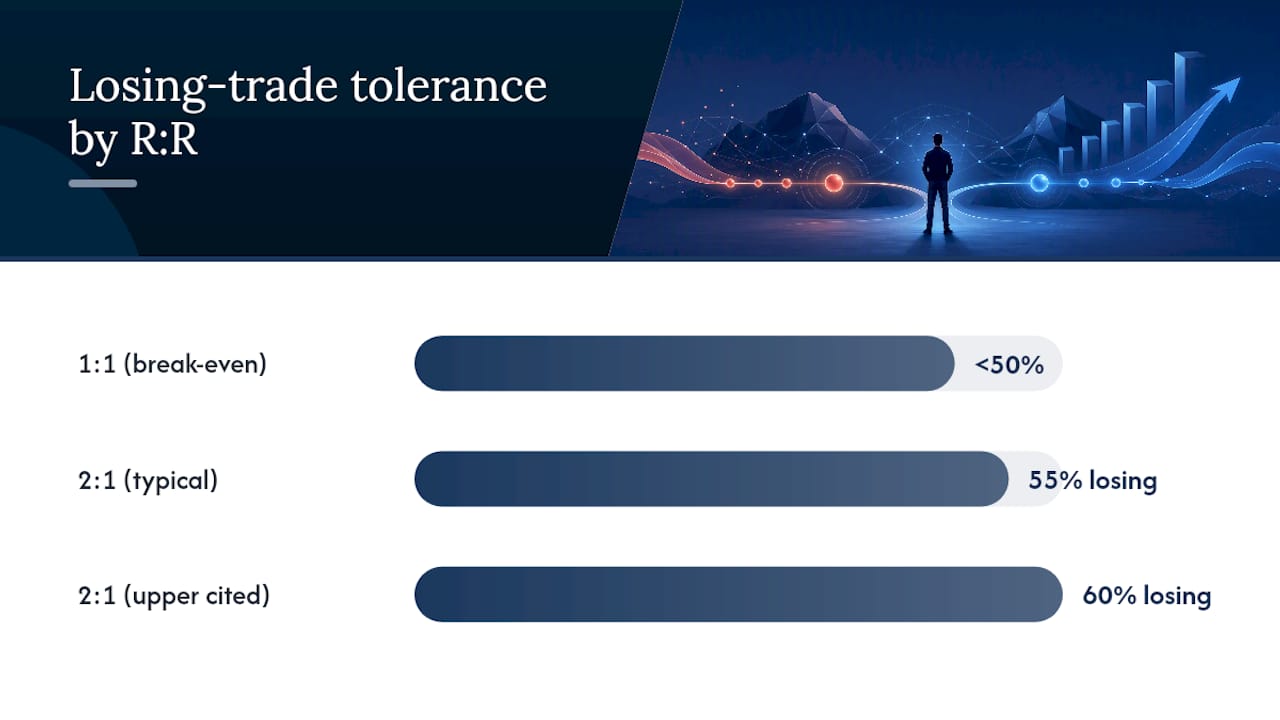
Reward-to-risk math is where most of the damage gets done. If you risk $50 to make $50, you need to win more than half your trades just to break even after commissions and slippage. Push that to a 2:1 ratio, risking $50 to make $100, and you can be profitable while losing 55% or even 60% of your trades. That math is why a minimum 2:1 reward-to-risk ratio shows up again and again in exit planning: it builds in room for the reality that intraday setups fail more often than they succeed cleanly.
Statistic Callout: A common intraday guideline calls for setting stop distances based on a multiple of the Average True Range on a short timeframe, widening the stop distance for higher-volatility instruments or momentum setups where whipsaws are more likely to trigger a stop before the real move happens.
Here's the core framework worth memorizing before you touch a chart:
- Scalps: tight stops, fixed small targets, no discretion once the order fills.
- Intraday swings: ATR-calibrated stops, tiered profit taking, defined flatten-by time.
- Any setup considering an overnight hold: not intraday, requires separate risk rules entirely.
- Every category: minimum 2:1 reward-to-risk before you consider the trade valid.
ATR matters here because it adapts to the instrument. A stop that's appropriate for a slow-moving large-cap will get run over in a volatile small-cap that moves 8% in twenty minutes. ATR normalizes that difference so your stop distance reflects what the stock is actually doing today, not an arbitrary percentage you picked because it felt round.
How Do You Place Stops That Won't Get Hunted?
Most retail traders place stops at round numbers or arbitrary percentage levels, like exactly 2% below entry. That's a mistake, because market makers and algorithms know exactly where those clusters sit and often push price just far enough to trigger them before reversing in your original direction.
The fix is placing stops where a violation of market structure actually invalidates your thesis, not where a round number happens to live.
- Identify the technical level that breaks your setup. That's usually the most recent swing low or swing high, a trendline, or a key moving average like the 9-EMA or 20-EMA on your working timeframe.
- Measure the ATR on your entry timeframe, typically the 5-minute chart for intraday swings. Multiply by 1.5 as your baseline distance.
- Compare the technical level to the ATR distance. If the swing low sits closer than 1.5× ATR, use the technical level. If it sits farther, widen to the ATR-based distance so normal noise doesn't stop you out early.
- Add a buffer beyond the technical level, roughly 10 to 15 cents on a small-cap trading under $20, or a few cents on a large-cap, to clear the liquidity cluster that sits exactly at the obvious level.
- For momentum or breakout setups, widen further. These trades often need 2× to 2.5× ATR because the volatility that creates the opportunity also creates bigger normal pullbacks.
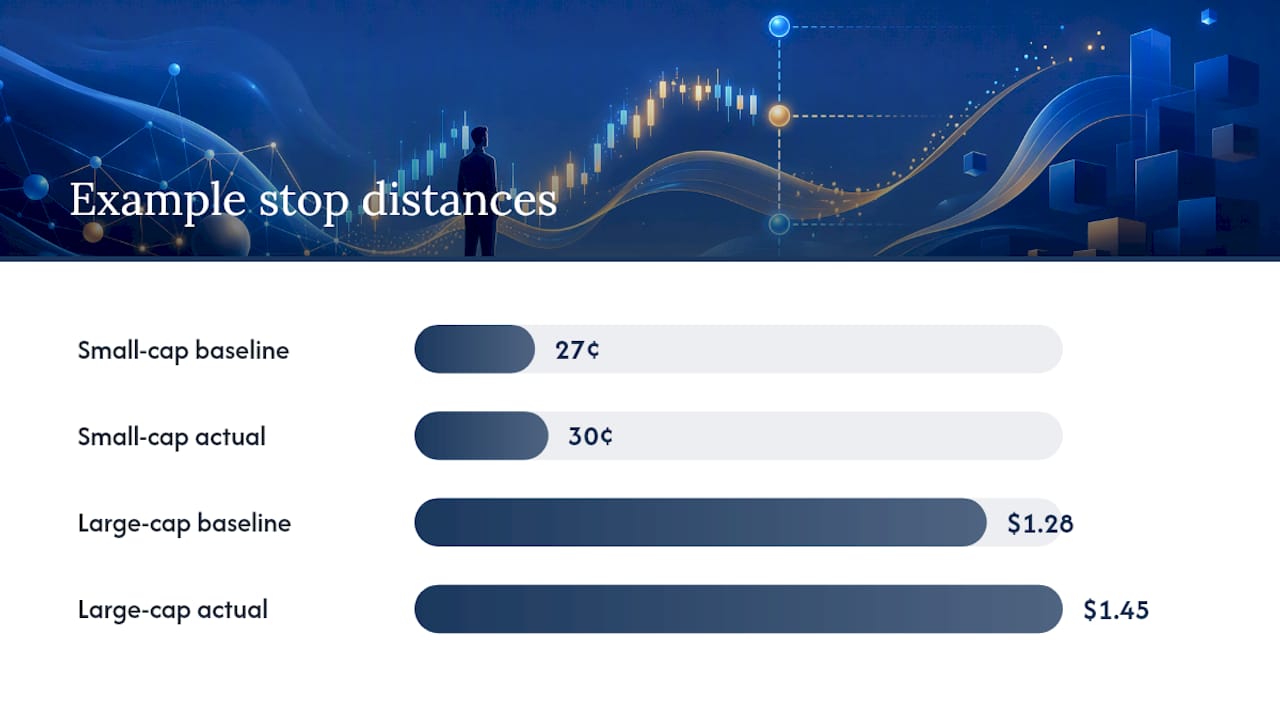
Concrete example: a small-cap trading at $4.50 with a 5-minute ATR of $0.18 gets a baseline stop 27 cents below entry, at $4.23, with a buffer pushing the actual stop to roughly $4.20. Compare that to a large-cap trading at $145 with a 5-minute ATR of $0.85. The baseline stop sits $1.28 below entry, at $143.72, with a buffer of maybe 15 to 20 cents pushing it to $143.55.
Pro Tip: Never set your stop at the exact swing low or high you're using as your reference point. Everyone else trading that chart sees the same level, and price frequently wicks a few cents through it before reversing. The buffer isn't optional. It's the difference between getting stopped out on noise and getting stopped out because your thesis actually failed.
When Should You Scale Out Instead of Exiting Fully?
Full exits leave money on the table when a trade keeps running, and they also feel psychologically brutal when you sell everything right before a stock doubles its move. Scaling out solves both problems, and the tiered structure below is a reliable starting point for intraday swings.
- Sell one-third of the position once price reaches 75% of your original target, locking in partial profit while the trade is still working.
- Sell another third at the original target level, banking the core of your planned gain.
- Trail the remaining third with an ATR-based trailing stop, typically 1.5× the 5-minute ATR, letting the position run as long as momentum holds.
- Move your stop on the remaining shares to breakeven the moment the first tier fills, removing all downside risk from the trade.
This isn't a rule to apply blindly, though. Certain conditions call for a full exit regardless of where you sit in the tier structure. A news gap against your position, an unexpected halt, or a sudden break of the structural level that got you into the trade in the first place all warrant closing the entire position immediately rather than waiting for a trailing stop to catch up.
Re-entry deserves its own rule, because getting stopped out and immediately jumping back in is one of the fastest ways to compound a small loss into a big one. If you're stopped out and price re-crosses your original entry within the same session, treat that as new information, not an invitation to revenge trade. Wait for a fresh setup that meets your entry criteria independently. Trade-4's same-day re-entry analytics exist specifically because how often a stopped trade re-crosses your entry changes what the optimal re-entry policy actually looks like, and that number is different for every setup type and instrument.
What Time Should You Flatten Intraday Positions?
Overnight risk is uncompensated risk for a day trader. You're not being paid to hold gap exposure, so the simplest rule in this entire framework is also one of the most important: pick a flatten-by time and respect it every single session.
A common practice is closing equity positions somewhere between 15 and 30 minutes before the close. That window gives you enough liquidity to exit without chasing a worse price into the closing bell, while still avoiding the unpredictable volatility that often shows up in the final minutes of the session.
The right flatten-by time isn't identical across setup types, though:
- Morning gap trades: exit by midday if the move hasn't developed, since gap momentum that hasn't confirmed within a few hours rarely confirms later.
- Momentum runners: hold longer, using the 15 to 30 minute pre-close window as your hard cutoff rather than an earlier one.
- Mean-reversion setups: exit once the reversion target hits, regardless of time, since these trades are thesis-driven rather than time-driven.
- Late-day breakouts: use a tighter cutoff, since a breakout with only 20 minutes of session left has less room to develop before you're forced to flatten anyway.
Execution quality degrades near the close. Spreads widen, and slippage on market orders gets noticeably worse as liquidity providers pull back ahead of the closing auction. If you're flattening a size position, start the process at the earlier end of your window rather than waiting until the last few minutes, when a wider spread can eat into gains you already earned.
Bracket Orders, Trailing Stops, and the Slippage You Can't Avoid
The rules above only work if the order types executing them behave the way you expect. A bracket order, also called an OCO or one-cancels-the-other order, bundles your entry with a profit target and a stop-loss simultaneously. The moment either the target or the stop fills, the other order cancels automatically. This is the single best habit a discretionary intraday trader can build, because it converts a plan into an executable order the instant you enter, removing the moment of hesitation where emotion usually wins.
- Bracket/OCO orders: best for traders who want the discipline of a fixed plan enforced without babysitting the position tick by tick.
- Trailing stops: better suited to momentum trades where you don't know how far price will run and want to capture more of an extended move than a fixed target would allow.
- Stop-market orders: guarantee execution once triggered but not price, meaning a fast-moving stock can fill you well below your intended stop level.
- Stop-limit orders: guarantee price but not execution, meaning a gap or fast move can blow through your limit price entirely and leave you holding the position with no exit.
Statistic Callout: Trailing stops typically convert to market orders the instant they trigger, and many platforms only manage them during regular trading hours, which means a trailing stop set the day before offers no protection against an overnight or pre-market gap.
That distinction between stop-market and stop-limit orders matters most on illiquid small-caps and during news-driven volatility, where the bid-ask spread can widen dramatically in seconds. A stop-market order on a thin small-cap might fill 3% or more away from your intended stop price during a fast move. A stop-limit order avoids that slippage but risks not filling at all if price gaps clean through your limit. There's no universal right answer here. Thicker, more liquid names can generally tolerate stop-market orders. Thinner small-caps often warrant a stop-limit with a wider limit buffer to balance the two risks.
How Much Should You Risk Per Trade and Per Day?
Every exit rule in this article assumes you've already sized the position correctly, because even a perfectly placed stop doesn't protect you if the position itself is too large for the risk you intended to take.
The formula is straightforward: position size equals your dollar risk per trade divided by your stop distance in dollars. If you're willing to risk $100 on a trade and your ATR-calibrated stop sits 40 cents from your entry, you buy 250 shares. Widen that stop to 80 cents for a more volatile setup, and the same $100 risk buys you only 125 shares. The stop distance, not a gut feeling about "how many shares feels right," determines position size every time.
If your per-trade risk is $100, a reasonable daily loss cap sits between $200 and $300. Hit that number, and you're done trading for the session regardless of how compelling the next setup looks.
- Calculate position size from dollar risk divided by stop distance, never the reverse.
- Keep per-trade risk small and consistent across every setup you take.
- Set a daily loss limit at two to three times your per-trade risk and treat it as absolute.
- Automate the daily limit where your platform allows it, so discipline doesn't depend on willpower in the moment.
- Step away from the screen entirely once the daily limit hits. Don't watch the market from the sidelines hoping to spot "one more" trade.
Pro Tip: Set your daily loss limit before the market opens, not after your third losing trade of the morning. The whole point of the rule is that it overrides your judgment in the moment, and you can't trust your judgment to set the limit once you're already down money and looking for a way to make it back.
Three Worked Examples You Can Backtest Today
- Morning breakout on a small-cap. Entry at $6.20 after a break of premarket high on volume. Five-minute ATR reads $0.24, so your stop sits 1.5× ATR below entry, roughly $6.20 minus $0.36, landing near $5.83 after a small buffer. Risking $100 at that 37-cent stop distance gives you a position of about 270 shares. Target sits at $6.92 for a 2:1 reward-to-risk ratio. A bracket order submits entry, target, and stop simultaneously. At $6.75, roughly 75% of the way to target, you sell 90 shares, sell another 90 at $6.92, and trail the final 90 shares with a stop set 1.5× ATR behind the highest price reached.
- Momentum run on a mid-cap. Entry at $32.10 on a breakout above a multi-week high. Five-minute ATR reads $0.55. Rather than a fixed target, you set a trailing stop at 1.5× ATR, or $0.83, behind the highest price the stock reaches after entry. If the stock stalls and pulls back and gets stopped out at $34.50, and price then re-crosses back above your original $32.10 entry within the same session, that's not an automatic re-entry signal. It's a new setup requiring its own confirmation before you commit capital again.
- A losing trade that tests your discipline. Three trades into the session, you're down $220 against a $250 daily loss limit. The next setup looks strong, but taking it with a normal position size would risk another $100, pushing a potential loss past your daily cap if it fails. The rule here isn't discretionary: either cut the position size so the trade's risk fits inside your remaining daily budget, or skip the trade entirely and end the session. The daily limit exists precisely for this moment, when the next trade always looks like the one that fixes everything.
Which Backtests Actually Validate These Exit Rules?
Reading a rule and knowing it works in your own trading are two different things, and the gap between them closes only through testing against historical data rather than assuming a guideline written for general intraday trading applies to your specific setups and instruments.
Run these tests specifically:
- An ATR-multiple sweep, testing stop distances from 1× through 2.5× ATR to find where your specific setup stops giving back winners to noise versus where it starts cutting good trades short.
- A trailing-stop window sweep, comparing tighter and wider trailing distances on momentum setups to see which preserves more of the average winning trade.
- A tier-size sensitivity test, checking whether 75%/100%/trail splits outperform other tiered combinations for your instrument mix.
- A time-exit effectiveness test, bucketing results by session (morning versus afternoon) since exit rules frequently perform differently depending on when the trade was taken.
- A slippage scenario test, applying realistic fill assumptions rather than assuming every exit fills at your exact intended price.
Trade-4's tick-accurate historical data, down to one-second granularity, combined with news tagging and same-day re-entry analytics, makes it possible to run these sweeps on your actual watchlist rather than a generic backtest of the broader market. The Trade4 backtester lets you bucket results by session and by setup type, which is exactly the granularity these tests require. For a walkthrough of building one of these tests from scratch, the step-by-step backtesting guide covers the setup process in detail.
The One-Page Rulebook for Every Intraday Trade
Print this and keep it next to your screen:
- Predefine your stop using ATR before entry, calibrated to technical structure.
- Set a profit target at a minimum 2:1 reward-to-risk ratio.
- Submit a bracket or OCO order so both exits are live the moment you're filled.
- Move your stop to breakeven after the first profit tier fills.
- Flatten by a preset time, typically 15 to 30 minutes before close.
- Enforce a hard daily loss limit and step away once it's hit.
Statistic Callout: Traders who skip exit planning entirely tend to hold losers too long and cut winners too short, the exact opposite of the 2:1 reward-to-risk discipline this rulebook is built around.
One philosophy carries the whole framework: decide your exits before you know whether the trade is a winner or a loser. Your next steps are simple. Backtest these parameters against your own watchlist, paper trade at least 20 trades using the exact rules above, and only scale real capital once the documented results support it.
Common Behavioral Traps and the Habit That Changed Outcomes
The hardest exit mistake to unlearn isn't technical. It's the habit of watching a stop get hit, feeling certain the market is wrong, and jumping back in without a fresh signal, only to watch the same stop get hit again.
The fix that actually changes outcomes isn't more willpower. It's pre-committing to bracket orders and a hard daily loss limit before the session starts, so the decision is made when you're calm rather than when you're three trades deep and emotional. For deeper backtest walkthroughs on how these rules perform across different setups, the Trade-4 blog is worth working through session by session.
— Romans